The Ultimate Manual for Mold Flipper Safe Operation & Daily Maintenance
A mold flipper is a cornerstone of many industrial operations, a powerful tool that can dramatically improve workflow. But with great power comes great responsibility. I've seen firsthand how a small oversight in operation can lead to catastrophic failures, causing costly downtime, damaging expensive molds, and worst of all, putting operators at serious risk. These incidents don't just stop a production line; they can erode profits and shake the confidence of your entire team. The good news is that nearly all of these problems are preventable. With a disciplined approach to safety and maintenance, you can transform your mold flipper from a potential liability into a reliable, efficient, and safe asset that serves your business for years to come. This is the knowledge I've gained from the factory floor to owning my own business, and it's what I want to share with you.
The ultimate manual for safe mold flipper operation and daily maintenance is a comprehensive system built on four key pillars: rigorous pre-operation safety checks, strict adherence to Standard Operating Procedures (SOPs), a non-negotiable daily maintenance routine, and a proactive approach to troubleshooting. This combination ensures machine longevity, operator safety, and maximum operational uptime.
This isn't just about following a checklist. It's about building a culture of safety and ownership around your equipment. When your team understands the "why" behind each step, they become partners in protecting your investment and ensuring smooth production. In this guide, I'll break down each of these pillars into simple, actionable steps. We will cover everything from the first check of the day to identifying problems before they halt your operations. Let's dive in and build that foundation of safety and efficiency together.
How to Perform a Pre-Operation Safety Check on a Mold Flipper?
It's the start of a busy shift, and the pressure is on to get production rolling. It can be tempting for an operator to jump straight to work, skipping the "routine" safety check. But this is a gamble. That five minutes saved could easily turn into five hours of downtime when a loose hydraulic fitting finally gives way, or a frayed wire causes a short. I've seen it happen. An entire day's production target can be missed because of a preventable issue. A disciplined, mandatory pre-operation check isn't red tape; it's your first line of defense against unexpected failures and costly accidents.
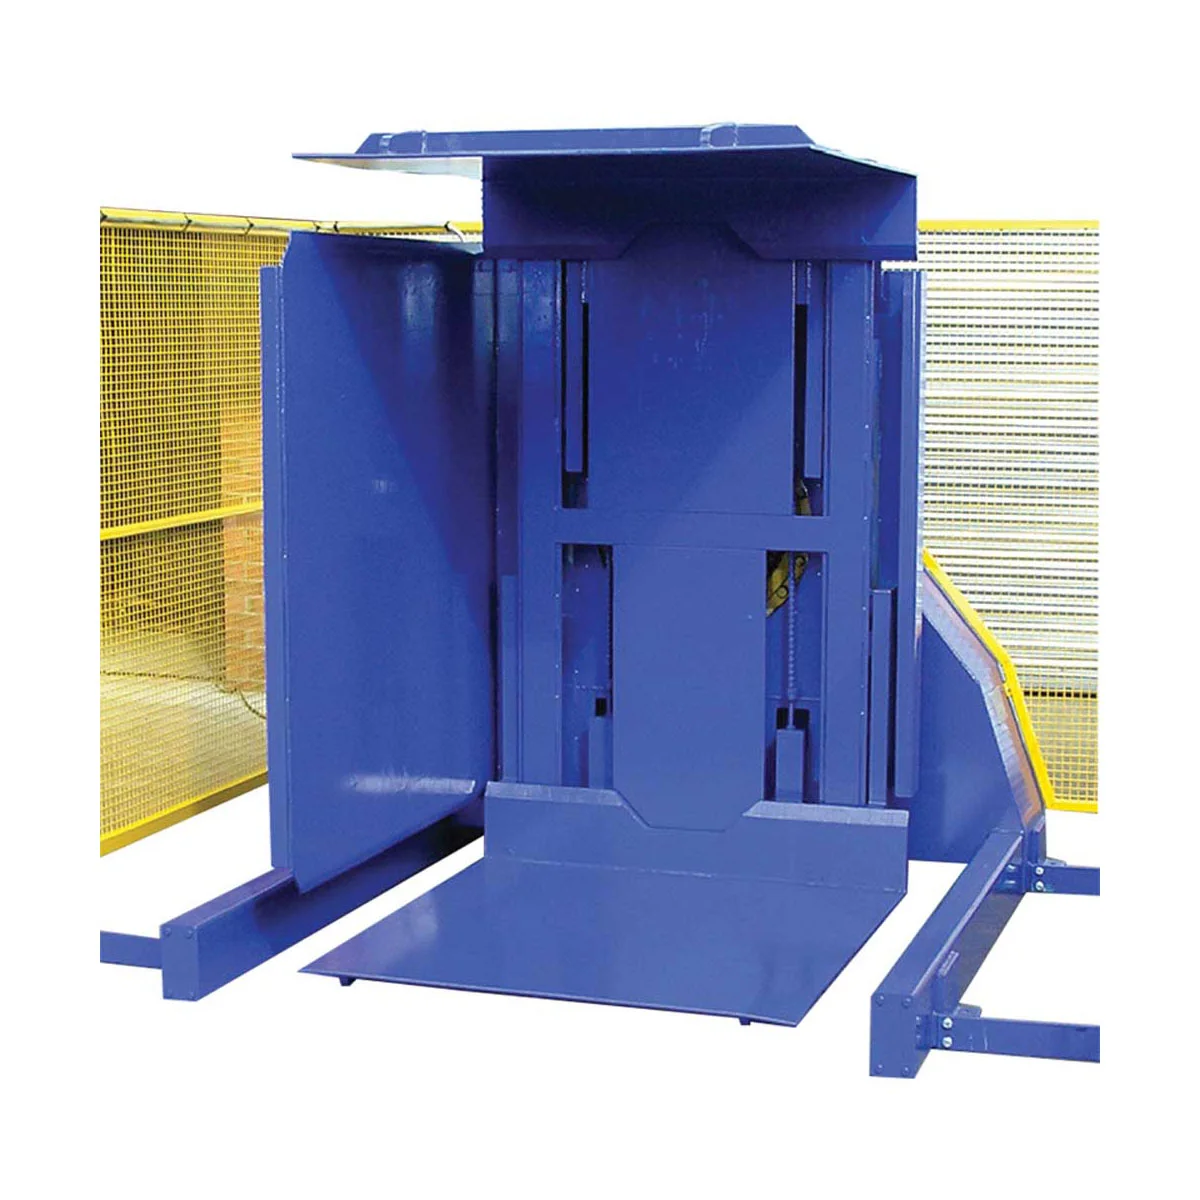
To perform a pre-operation safety check, an operator must conduct a systematic "walk-around" inspection before powering on the machine. This involves visually and physically examining the machine's structure, hydraulic system, electrical components, and all safety mechanisms to ensure they are in proper working order.
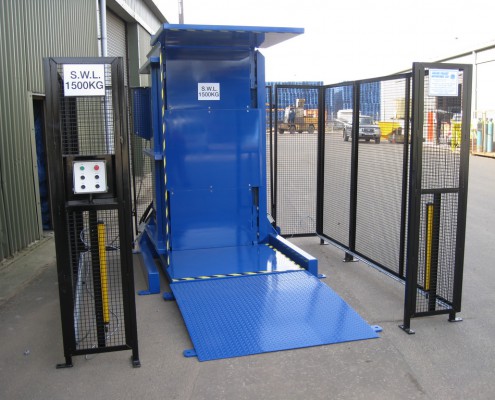
A thorough check is about being systematic. It's not a quick glance; it's an intentional inspection. As an engineer who has designed and built these machines, I know where the stress points are and what components are most critical. By breaking the inspection down into logical areas, you ensure nothing is missed. This process empowers your operators to spot small issues, like a minor leak or a loose bolt, before they escalate into major breakdowns that impact your bottom line and your production schedule.
The Physical Walk-Around: A Three-Sense Approach
I always train operators to use three senses: sight, hearing, and touch (when safe to do so). Before the main power is even switched on, walk a full circle around the machine.
- Sight: Look for any oil puddles or drips on the floor, which indicate a hydraulic leak. Check the condition of hydraulic hoses for cracks, bulges, or abrasions. Inspect the structural frame and welds for any signs of stress or cracking. Ensure all safety guards and covers are securely in place.
- Hearing: As you move components by hand (if possible and safe), listen for any unusual grinding or squeaking that could indicate a lack of lubrication or a failing bearing.
- Touch: With the machine de-energized, check that critical bolts on the base and rotating assembly are tight. Feel the surface of hydraulic hoses (if not under pressure) to detect soft spots or abnormalities.
A Deeper Dive into Critical Systems
After the initial walk-around, focus on specific systems. This systematic approach is crucial, especially for equipment that has been in service for a long time. It helps you stay ahead of age-related failures.
| Component / System | What to Check | Acceptable Condition | Action if Failed |
|---|---|---|---|
| Emergency Stop | Physically press all E-stop buttons. | Buttons should latch in and be easily accessible. | Do not operate. Tag out the machine and report to maintenance. |
| Hydraulic System | Check hydraulic fluid level in the reservoir. | Fluid level should be within the high/low marks on the gauge. | Top up with the correct type of hydraulic oil. |
| Inspect all hoses and fittings for leaks. | No visible drips, wetness, or signs of seepage. | Tighten fittings if loose. Replace damaged hoses immediately. | |
| Electrical System | Check the main power cable for damage. | Cable insulation should be intact, with no cuts or frays. | Do not operate. Report for electrical maintenance. |
| Ensure control panel is clean and dry. | All buttons and switches should be clean and functional. | Clean the panel. Report any malfunctioning controls. | |
| Mechanical Frame | Look for loose or missing bolts and nuts. | All fasteners must be present and tight. | Tighten any loose fasteners. Replace any that are missing. |
| Work Area | Ensure the area is clear of obstacles. | A clear 3-foot (1-meter) radius around the machine. | Remove all tools, materials, and debris from the area. |
This checklist shouldn't just be a mental exercise. It should be a physical document or a digital form that the operator signs off on at the start of every shift. This creates accountability and provides a valuable record for tracking the machine's condition over time.
What are the Standard Operating Procedures (SOPs) for a Mold Flipper?
Without a clear, documented process, every operator might develop their own "style" of using a machine. One might favor a faster rotation speed, while another might clamp the mold with slightly less pressure. These small inconsistencies create big problems. They lead to uneven wear on the machine, unpredictable performance, and an increased risk of accidents. When a new operator is trained by an old one, bad habits get passed down. You need one source of truth. A Standard Operating Procedure (SOP) provides that truth, ensuring every cycle is performed with the same level of safety and efficiency.
Standard Operating Procedures (SOPs) for a mold flipper are a formal, written set of instructions that detail the correct, step-by-step method for every phase of its use. This includes loading the mold, securing it, operating the rotation, un-securing it, and unloading it safely.
Think of an SOP as the machine's user manual, but simplified and tailored specifically to your workplace and your products. It removes guesswork and ambiguity. For a business owner like Javier, who needs to ensure consistent quality and output, SOPs are not just about safety; they are a fundamental tool for process control. They ensure that the machine is used as it was designed to be used, protecting your investment and your people.
The Five Critical Phases of Operation
Every cycle of the mold flipper can be broken down into five distinct phases. Your SOP must detail the exact actions for each one. I've seen the most issues arise when steps in these phases are rushed or skipped.
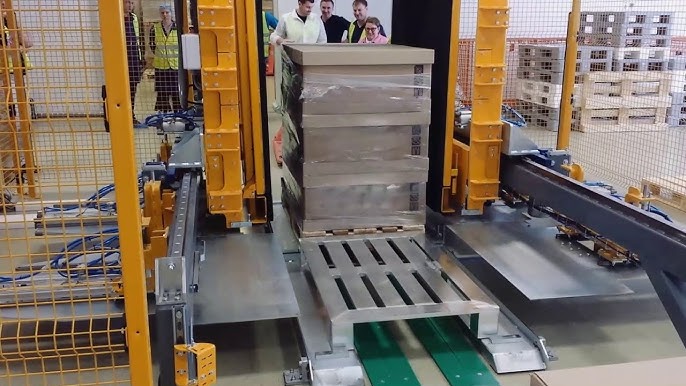
1. Loading the Mold
This is where precision starts. The SOP should specify how the mold is to be brought to the machine (e.g., by overhead crane, forklift). It must clearly state the correct orientation and placement of the mold on the flipper's table. A critical instruction is to ensure the mold's center of gravity is as close as possible to the flipper's center of rotation. A poorly centered load puts immense stress on the drive motor and bearings during rotation.
2. Securing the Mold
This step is all about safety. The SOP must outline the procedure for engaging the clamping system. If it's a hydraulic system, it should specify the target pressure on the gauge. If it's manual, it should describe how to tighten the clamps and how to verify they are secure. A "push test" – gently trying to move the mold after clamping – should be a mandatory part of this phase.
3. Operating the Flip
The SOP should instruct the operator to clear the area and ensure all personnel are at a safe distance. The procedure should state to use smooth, controlled inputs. For example, "Press and hold the 'Rotate' button. Do not jog the machine." It should also instruct the operator to listen for any unusual noises (grinding, popping) or watch for jerky movements during the flip. If any are detected, the SOP should be clear: "Immediately release the button and press the E-stop."
4. Un-securing the Mold
Once the flip is complete, the process of releasing the mold must also be standardized. The SOP should specify the sequence for releasing the clamps to ensure the mold remains stable and does not shift unexpectedly.
5. Unloading the Mold
Finally, the SOP must detail the safe removal of the mold from the machine. This includes instructions for the crane or forklift operator to ensure a straight, controlled lift without putting side-load on the flipper's table.
Why SOPs are a Living Document
An SOP should not be written once and then filed away. It should be posted clearly at the machine. It needs to be reviewed regularly, especially if you introduce new types of molds or if the machine undergoes modification. I always recommend that the operators themselves be involved in reviewing and updating the SOPs. They are the ones using the machine every day, and their feedback is invaluable for making the procedures practical and effective. This fosters a sense of ownership and reinforces a culture of continuous improvement.
What Does a Daily Maintenance Routine for a Mold Flipper Involve?
You wouldn't run your car for months without checking the oil. Yet, I've visited plants where powerful, expensive machinery is run shift after shift with minimal daily attention. This neglect is a silent killer of productivity. Small issues, like a dirty sensor or a dry pivot point, accumulate over time. Eventually, they cause a sudden, unexpected breakdown that brings everything to a halt. The cost of that emergency repair and lost production is always far greater than the cost of a few minutes of daily maintenance. A consistent daily routine is the single best investment you can make in the long-term health of your equipment.
A daily maintenance routine for a mold flipper is a short, standardized set of tasks performed every day to ensure the machine remains clean, lubricated, and in good working order. It primarily involves cleaning key components, lubricating moving parts according to a schedule, and checking fluid levels.

This routine is not the same as the pre-operation check. The pre-op check is an inspection. The daily maintenance is an action. It's about actively caring for the machine to prevent the very issues you look for in the inspection. For a CEO like Javier, focused on reducing operational costs and improving equipment uptime, implementing a simple yet robust daily maintenance plan is a direct path to achieving those goals.
The Core Tasks: Clean, Lubricate, and Check
A good daily routine can be completed in 15-20 minutes at the end of a shift and should focus on three areas.
1. Cleanliness is Next to Godliness (and Uptime)
Debris, dust, and grime are enemies of machinery.
- Wipe Down Surfaces: Clean the main tables and the base of the machine to remove any metal shavings, dust, or spilled fluids. This prevents debris from working its way into moving parts.
- Clean Sensors: Photo-eyes and proximity sensors are the "eyes" of the machine. If they get covered in dirt or oil, they can fail, causing the machine to stop or behave erratically. Wipe them gently with a clean, soft cloth.
- Clear the Pit/Base: Ensure the area under the machine is free of debris that could obstruct movement or become a safety hazard.
2. Lubrication: The Lifeblood of Motion
Proper lubrication is what prevents metal-on-metal wear, the primary cause of mechanical failure.
- Identify Grease Points: Your machine's manual will have a lubrication chart showing all the grease fittings (zerks). These are typically on pivot points, bearings, and drive mechanisms.
- Follow the Schedule: Some points may need grease daily, others weekly. The daily routine should include greasing all the daily points. A simple grease gun is all that's needed. I teach operators to wipe the zerk clean before attaching the gun to prevent injecting dirt into the bearing. Pump until you see a small amount of fresh grease emerge from the seal.
- Chain and Drive Systems: If the flipper uses a chain drive, check the chain for proper lubrication and tension. A light application of chain lube may be needed.
3. Check Fluids and Filters
This is a quick verification to catch any ongoing issues.
- Hydraulic Fluid: A final check of the hydraulic fluid level at the end of the day can reveal a slow leak that wasn't obvious in the morning.
- Filter Indicators: Many hydraulic systems have filter condition indicators. A quick glance can tell you if a filter is becoming clogged and needs to be scheduled for replacement.
Documentation: Creating a History
Just like the pre-op check, this daily routine should be documented. A simple logbook or digital form where the operator checks off each task creates accountability. It also creates an invaluable maintenance history for the machine. If a problem does arise, you can look back at the logs and see if there were any signs leading up to it. This data is the first step toward a more advanced predictive maintenance strategy.
How to Troubleshoot Common Mold Flipper Issues?
Even with the best maintenance, a machine will eventually have a problem. When a mold flipper stops, the clock starts ticking. Every minute of downtime is a minute of lost production and lost revenue. The first instinct is often to call for a maintenance technician, but this can mean waiting for hours. The frustration on the factory floor grows. But many common problems have simple solutions that an operator or a first-level maintenance person can fix if they know what to look for. Empowering your team with basic troubleshooting skills can turn hours of downtime into minutes.
Troubleshooting common mold flipper issues involves a logical, step-by-step process of elimination. Start by observing the exact symptom, then check the simplest and most common causes first—such as power, emergency stops, and hydraulic pressure—before moving on to more complex diagnostics.
The key is to avoid panic and approach the problem systematically. As an engineer, I was trained to break down complex systems into smaller, manageable parts. The same logic applies here. Is the problem electrical? Is it hydraulic? Or is it mechanical? By asking these questions, you can quickly narrow down the possibilities and find the root cause much faster. This approach is essential for any plant manager aiming for 95% equipment uptime.
The Three Diagnostic Categories
When a fault occurs, the first step is to categorize it. This immediately focuses your efforts.
1. Is it an Electrical Problem?
These are often the easiest to check and solve.
- No Power at All: Is the machine completely dead? Check the main disconnect switch. Is a circuit breaker tripped in the main panel? Has an E-stop button been pressed? I've lost count of the number of "broken" machines I've fixed simply by resetting an E-stop.
- A Specific Function Fails: If the machine gets power but one button doesn't work (e.g., 'Clamp'), it could be a faulty switch on the control panel, a loose wire, or a failed solenoid on the corresponding hydraulic valve.
2. Is it a Hydraulic Problem?
Hydraulic issues often present as a lack of power or slow, jerky movements.
- Slow or Weak Motion: The number one cause is low hydraulic fluid. Check the reservoir level. The second most common cause is a clogged filter, which restricts flow. Check the filter indicator.
- Jerky Motion: This is often caused by air in the hydraulic lines. The machine may need to have its hydraulic circuit bled (a procedure that should be in the manual).
- No Motion, but Motor Runs: If you can hear the hydraulic pump motor running but nothing moves, it could be a failed pump, a relief valve that is stuck open, or a major leak.
3. Is it a Mechanical Problem?
These are typically identified by unusual noises or physical obstructions.
- Loud Grinding or Squealing: Stop the machine immediately. This almost always indicates a lack of lubrication or a failing bearing. Inspect all pivot points.
- Machine Jams Mid-Cycle: This could be caused by a foreign object obstructing the path of movement. Do a thorough visual inspection. It could also indicate a component failure, like a seized bearing or a broken drive chain.
Practical Troubleshooting Chart
Here is a simple table your team can use as a first-response guide. This should be posted near the machine.
| Symptom | Possible Cause | First Action to Take |
|---|---|---|
| Machine will not start | 1. E-Stop is pressed. 2. Main power is off. |
1. Twist to release all E-stop buttons. 2. Check main breaker/disconnect. |
| Hydraulic motor runs, but no movement | 1. Low hydraulic oil. 2. Directional valve failed. |
1. Check oil level in reservoir. 2. Listen for 'click' from valve solenoid. |
| Movement is slow or weak | 1. Low hydraulic oil. 2. Clogged filter. |
1. Check and top up oil. 2. Check filter condition indicator. |
| Movement is jerky or shudders | Air in the hydraulic system. | Refer to manual for the air bleeding procedure. Report to maintenance. |
| Loud, unusual noise during operation | 1. Lack of lubrication. 2. Failing bearing. |
1. Stop immediately. Lubricate all points. 2. Inspect for heat/vibration. |
By training your operators and floor supervisors to use this logical process, you solve problems faster and reduce reliance on specialized technicians for simple fixes.
My Insights on Enhancing Mold Flipper Longevity and Efficiency
Running a factory taught me a critical lesson: maintaining equipment is good, but optimizing it is better. Simply following the manual for daily checks and repairs will keep a machine running. But to truly get ahead of rising energy costs, aging equipment, and market pressures, you need to think beyond the basics. For a forward-thinking leader like Javier, who has already embraced innovation with things like waste heat recovery, the next frontier is making every single asset, including your mold flipper, smarter and more efficient. It's about transforming a piece of equipment from a cost center into a high-performing, data-generating asset.
Enhancing a mold flipper’s longevity and efficiency requires moving from a reactive maintenance model to a proactive, data-driven one. This involves leveraging simple technology for predictive maintenance, making strategic upgrades to older systems, and, most importantly, building a deep culture of operator ownership and care.
From my journey starting as an engineer on the factory floor to building my own company, I've seen the incredible impact of this mindset shift. It’s the difference between just surviving and actively thriving. It's about making small, smart investments that pay huge dividends in uptime, reduced energy bills, and a longer, more productive life for your machinery. Here are the strategies that have delivered the best results for me and my clients.
Embrace Data for Predictive Maintenance
Your goal of 95% uptime is absolutely achievable, but not with a calendar-based maintenance schedule alone. You need to listen to what the machine is telling you.
- Vibration Analysis: A simple, handheld vibration sensor is an affordable tool. By taking a baseline reading on the main drive motor and key bearing housings when the machine is healthy, you can perform monthly checks. A rising trend in vibration is the earliest indicator of a bearing or alignment issue, giving you weeks or even months of warning before a failure.
- Thermal Imaging: An infrared camera can spot problems a visual inspection will miss. Scan the electrical cabinet to find hot spots on contactors or breakers, indicating a poor connection and a fire risk. Scan the hydraulic pump and motor; an unusually high temperature points to inefficiency or an impending failure.
- IoT Integration: For critical machines, you can install permanent sensors for temperature and pressure that feed data directly into your MES or a central dashboard. This aligns perfectly with a digital transformation goal. You can set alerts, for example, "Notify maintenance if hydraulic fluid temperature exceeds 60°C." This isn't futuristic technology anymore; it's a practical tool for modern factories.
Strategic Upgrades for Lasting Performance
An older machine frame is often built to last, but its components can become inefficient. Instead of replacing the entire machine, consider targeted upgrades.
- Energy-Efficient Components: Your challenge with energy costs is a big one. A 15-year-old hydraulic power unit or electric motor is significantly less efficient than its modern counterpart. Swapping out an old standard motor for a premium-efficiency one can have a payback period of less than two years in energy savings alone. The same goes for upgrading to a modern, variable-displacement hydraulic pump that only provides pressure when needed.
- PLC and Control Upgrades: An old relay-logic control system is reliable but inflexible. Upgrading to a modern PLC (Programmable Logic Controller) not only improves reliability but also allows for much easier integration with your plant-wide control systems. This is a foundational step for collecting data and achieving the full production visualization you're aiming for.
The Ultimate Factor: Your People
Technology and upgrades are powerful, but I believe the most important factor in a machine's longevity is the operator. When I started my own factory, I didn't just train my team on how to press buttons. I taught them how the machine works. I explained why lubrication is important, and what that strange noise means.
When an operator feels a sense of ownership, they stop being just an operator. They become the machine's first line of defense. They will clean it better, report small issues sooner, and handle it with more care. Investing in training and empowering your team to understand the "why" will give you a better return than any sensor you can buy. It builds a culture that values the equipment, which is the ultimate key to reducing costs and maximizing the life of your investment.
Conclusion
Mastering your mold flipper through safe operation and diligent maintenance is not just about preventing accidents. It’s a direct investment in your plant’s uptime, efficiency, and profitability.


